Function Of A Clutch
Put simply, a clutch in a vehicle provides a mechanical link between the engine and the driveline that has to be manually activated to decouple the engine from the transmission during gear changes. If the clutch is fully engaged, there is no slippage between the engine and the transmission, which means that all of the engine’s power and torque is transmitted to the driving wheels through the transmission.
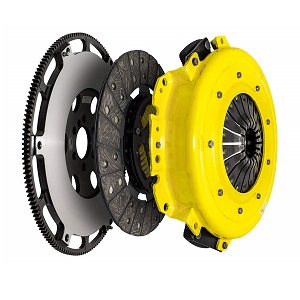
In its most basic form, an automotive clutch consists of a driven plate that is fitted with friction linings, which is clamped between the flywheel and a spring-loaded pressure plate. When the clutch pedal is depressed, hydraulic forces via a simple hydraulic system (or less commonly mechanical forces via a clutch cable) act on the release bearing (aka throw-out bearing) which moves the pressure plate. This disengages the clutch and prevents power transfer from the engine to the wheels.
Releasing the clutch pedal allows the spring-loaded pressure plate to act on the driven plate, and assuming that the clutch assembly is in good mechanical condition, the spring-loaded pressure plate will again clamp the driven plate between itself and the flywheel to re-establish the mechanical link between the engine and the transmission.
Common Symptoms Of A Faulty Clutch
The most common symptoms of a faulty clutch are as follows:
Clutch Slipping
This can happen for a variety of reasons including excessive wear of the friction linings, oil contamination of the driven plate, over adjustment of the clutch that reduces the pressure plate’s clamping force, mechanical damage to the pressure plate, and overheating of the clutch. This is most obvious under hard acceleration, particularly in high gears. Typically, you’ll notice that the engine rpm will increase but the vehicle will not accelerate as expected.
Clutch Vibration
This manifests as a severe jerking or shuddering when the clutch is engaged, and can be caused by broken or damaged springs in the driven plate’s hub, damaged or broken springs in a dual-mass flywheel, or by damaged friction linings on the driven plate. Note that damaged, broken, or worn engine mounts and/or transmission mounts can exhibit similar symptoms, so it’s important to check these prior to purchasing a new clutch.
Difficulty Shifting
This can happen as the result of poor adjustment of the clutch release mechanism, or damage to the pressure plate that keeps the driven plate partially engaged. In this condition, the mechanical link between the engine and transmission is not fully broken, which could make gearshifts very difficult or impossible to accomplish. This condition is also often accompanied by grinding noise during gear changes.
Clutch Pedal Hard To Depress
This is usually caused by broken components in the pressure plate that prevent the free movement of the spring-loaded diaphragm that exerts the clamping force on the driven plate.
Whining or Grinding When Clutch Pedal Depressed
This is almost always caused by a worn or damaged release/throw-out bearing. With the clutch pedal pushed down, a whining or low pitched grinding noise will be noticeable. This is most obvious when the vehicle is stopped since it can be quiet and easily drowned out by road noise if the vehicle is in motion.
Replacing A Clutch
It should be noted that while many, if not most clutches can be replaced on a DIY basis, the process is pretty involved and challenging. When replacing the clutch, it is also a good time to replace the inexpensive components such as the throwout bearing and clutch slave cylinder in order to save on future labor costs since you will be doing most of the work as part of your clutch job.
Note: The example steps below are intended for general informational purposes solely to help give you an idea of project difficulty and tools required. As all cars are engineered differently, repair procedures and safety hazards vary from vehicle to vehicle. To ensure that you have a vehicle specific repair procedure and an exhaustive list of potential safety hazards, we advise you reference a factory service manual for your vehicle. Similarly, referencing a repair manual such as Chilton or Haynes might serve as a less expensive alternative.
Step 1 – Lift the vehicle off the ground using a floor jack with suitable capacity and support the vehicle safely with a set of jack stands. You will want to make sure that you use the lifting points as specified in your owner’s manual. This job requires significant time underneath your vehicle, so make sure you lift the vehicle high enough that you can work underneath comfortably. This job is messy so if you don’t have a coated garage floor, you may consider investing in a tarp or garage floor mat to make clean up easier.
Step 2 – If the vehicle is RWD, remove the driveshaft, and drain the transmission oil into an appropriately sized oil drain pan. If the vehicle is FWD, you may need to remove some of the suspension components as well as the driveshafts. Drain the transmission oil before removing the drive shafts to avoid making a mess on your garage floor.
Step 3 – On RWD vehicles, safely support the engine and transmission independently. Remove the transmission crossmember. These bolts can be stuck and usually have a high torque specification, so a breaker bar and a can of penetrant will likely come in handy. Remove all electrical connectors and brackets mounted to the transmission (such as exhaust mounting). You may also have to remove some of the exhaust system to gain necessary access before you can remove the transmission from the vehicle. Spacing can be tight so a set of ratcheting wrenches can make this process much easier and less time consuming. Finally, remove all bolts holding the engine and transmission together using a socket set (again making sure your transmission is adequately supported prior). Once the transmission is free, use a transmission jack to lower the transmission out of your way.
On FWD vehicles, the process is generally similar to above. Depending on the vehicle, you may need to remove the entire engine and transmission assembly from the vehicle using an engine hoist prior to separating the components. Once complete, separate the transmission from the engine. If the engine is out of the car, most bolts should be accessible using tools from a regular socket set. If you find access to some fasteners is a challenge, you may consider using a wobble extension, a regular socket extension, or a set of deep sockets to make it easier to access bolts in tight spaces.
Step 4 – Once the engine and transmission are separated, remove the clutch from the flywheel, and inspect the flywheel for signs of discoloration, scoring, or surface cracks. If any of these are present, remove the flywheel and replace it. DO NOT fit a new clutch to a damaged flywheel! If you do, the clutch may not work as it should, and it may even fail prematurely. You may read about our flywheel brand recommendations by clicking here.
Use a clutch alignment tool to ensure the new driven plate is centered on the fly wheel to prevent damaging the plate’s hub during reassembly. Fit the new release/throw out bearing to the transmission, and make sure all retaining clips are located correctly to prevent damage to the bearing and the pressure plate during use of the clutch.
Step 5 – Reassemble all parts in the reverse order of removal, and make sure all fasteners are torqued down to their specified values using a suitably rated and calibrated torque wrench to prevent critical bolted joints from failing during normal operation of the vehicle.
Step 6 – Refill the transmission with new oil, test the clutch for proper operation, and make adjustments (where applicable/necessary) to ensure that the system has been reinstalled properly.
Best Clutch Brands
Luk
 Luk is one of the leading suppliers of OEM clutches to automakers that include Toyota, General Motors, Chrysler, and Ford. Luk also holds many patents for their range of products, which is indicative that they are a company that tries to advance automotive technology (which we as automotive enthusiasts are in favor of). Overall, we are confident that you will get a high quality clutch if you opt for Luk for your next clutch replacement.
Click here to find a Luk clutch for your vehicle.
ACT
 Although ACT supplies clutches for street use, the company focuses on competition and high-performance products. However, regardless of the intended application, ACT clutch kits are individually balanced and tested before shipment, which ensures that ACT clutches are built to extremely high quality standards. Moreover, unlike the products of most other manufacturers, many ACT clutches come with a limited 1-year warranty. As such, we can give ACT a strong recommendation as we expect you’ll be happy choosing one of their clutches.
Click here to find an ACT clutch for your vehicle.
Sachs
 Sachs is widely recognized as one of the leading manufacturers and suppliers of OEM clutches in the world, and their products are used in all vehicle categories. Sachs is well known for making highly reliable clutches that can last a very long time. In addition to clutches, Sachs also makes suspension components such as struts and shocks. Overall, considering their widespread use due to their overall appeal, it’s hard to go wrong if you decide on a Sachs clutch to replace the clutch in your vehicle.
