Function Of Distributors
As the name suggests, the function of an ignition distributor is to distribute ignition sparks to the spark plugs according to the engine’s firing order. In terms of operating principles, distributors are driven by the engine, either via a connecting gear that is driven by the crankshaft or via a direct connection (usually gear driven) with the camshaft.
A distributor typically has a single input wire that carries current to the distributor. Within a distributor, a rotor spins in time with your engine. As it spins, it sequentially passes current from the input to each of the spark plug wires, which are connected to the output side of the distributor (usually the distributor cap). Only one spark plug gets current at a time, and the order is synchronized to the engine’s cylinder firing order to ensure that current is passed to the spark plug wire at the correct time to ignite the air/fuel mixture within the cylinder. Often times, you can advance or retard (slow) the ignition timing by adjusting the distributor.
Older distributors contained replaceable contact breaker points (often referred to in shorthand as “points”), but more modern distributors did away with these in favour of more integrated designs. In addition, like the points the distributor cap and rotor can often be replaced without replacing the entire distributor.
Common Symptoms Of Faulty Distributors
The symptoms of defective or malfunctioning distributors could include one or more of the following:
Vehicle Doesn’t Start
This could be caused by the failure of any component within a distributor, although the most common failures are broken or worn contacts in the center pin in the cap, broken or cracked rotor arms, and/or failures of internal condensers (aka capacitors). As a general rule, the optic and magnetic sensors that are contained within distributors are very reliable, and although failures of these components do occur, it happens very rarely.
Misfires / Backfires
Faulty distributors can cause severe misfires, which could include backfires through either the intake and exhaust systems. In most cases, this is caused by sometimes-invisible cracks in the distributor cap that allow an ignition spark to “track” between two or more (not always adjacent) spark plug lead terminals. This results in sending current to a spark plug at the wrong time and igniting the air/fuel mixture in the associated cylinder either too early or too late.
Depending on the firing order, where the crack in the cap is located, and which pins are involved, this can cause backfires that are sufficiently violent to damage exhaust components. In severe cases, this can also damage cylinder head gaskets and bend connecting rods when a spark jumps to a cylinder that is just commencing its compression stroke.
Engine Hesitation Or Stumbling
All distributors that generate ignition sparks also incorporate mechanisms with which to advance the ignition timing to compensate for the increased upward motion of the pistons as the engine speed increases. When this mechanism malfunctions, the ignition timing cannot be advanced far enough or quickly enough to match the engine speed. As a result, the ignition sparks are delivered too late in the compression stroke, which causes severe hesitation, stumbling, and or backfiring upon acceleration.
Replacing A Distributor
Replacing a distributor is a relatively straightforward procedure that should be well within the capabilities of most DIY mechanics.
Note: The example steps below are intended for general informational purposes solely to help give you an idea of project difficulty and tools required. As all cars are engineered differently, repair procedures and safety hazards vary from vehicle to vehicle. To ensure that you have a vehicle specific repair procedure and an exhaustive list of potential safety hazards, we advise you reference a factory service manual for your vehicle. Similarly, referencing a repair manual such as Chilton or Haynes might serve as a less expensive alternative.
Step 1 – Make sure the engine is cold to prevent burns and scalds.
Step 2 – Identify and trace the spark plug lead on cylinder #1 back to the distributor, and note which terminal on the distributor cap it connects to. This is important, because it will help you to eliminate issues with the firing order later on. Make a small mark on the distributor’s metal body that aligns with terminal #1 on the distributor cap. You may also consider taking a photo here to help you remember how the wires were connected.
Step 3 – Use appropriate tools such as screwdrivers to remove the clips or screws holding the cap onto the distributor body. Lift the cap clear of the distributor, and note the position of the rotor arm.
In most cases, once the cap is off you will notice a reference mark in the form of a notch or similar in the metal rim of the distributor body. It is helpful to align the rotor arm with this mark prior to removal to make it easier to insert the replacement distributor correctly (since you’ll then be able to use the same marks on the new distributor to align it properly when installing). If space allows, use a suitable breaker bar and deep socket to rotate the engine in its normal direction of rotation by fitting the socket over the central bolt in the crank pulley (harmonic) balancer, and using the ratchet to obtain leverage until you see the rotor come into alignment with the mark.
Step 4 – Once the reference marks aligns with the rotor arm, mark the distributor body’s position relative to the engine block by noting the position of the retaining bolts in the slots that allow for adjustment. If necessary, take a photo of this position to help you locate the replacement distributor correctly, which will make it easier to properly set your ignition timing later.
Step 5 – Disconnect all electrical connectors and /or vacuum hoses on the old distributor, and use suitable tools such as ⅜-inch drive sockets, ratchets, extension bars, and swivel joints to remove all retaining bolts holding the distributor in place.
Step 6 – Once all retaining bolts are removed, carefully extract the old distributor from the engine. Make sure that the replacement distributor is identical to the old one in all respects, paying particular attention to the number and orientation of the teeth on the drive gear.
Fit new O-rings and other seals, and insert the new distributor into the engine without the cap attached, but note though that it is highly unlikely that your reference mark will align with the rotor on the first attempt. You may have to extract the new unit and adjust by rotating the rotor arm by small amounts several times until they do.
Step 7 – When you are satisfied that the new distributor is seated correctly with regard to all reference marks, insert all fasteners, and use a properly calibrated torque wrench to torque them down to their manufacturer recommended torque values.
Fit the cap onto the new distributor, and transfer all the plug leads to the new cap. Note the orientation old cap during this step because it is vitally important to attach plug leads to the terminals correctly. You can refer back to the marks you made on the distributor you removed or the photos you took to help with this step. If you get this wrong you get the engine’s firing order wrong, and as a result, you could end up with a no start condition, or severe misfires, or a severe loss of engine power.
Step 8 – Reconnect all electrical connectors and/or vacuum leads, and start the engine. Verify the ignition timing‘s base and maximum advance settings using a timing light to make sure your ignition timing is set properly. Once you are certain that everything is reassembled properly and your ignition timing is set, take a test drive to verify the repair and troubleshoot as necessary.
Best Distributor Brands
When it comes to choosing a distributor, there are tons of options out there. Below we share our favorites, as we contend that these are the best ignition distributor brands on the market.
MSD
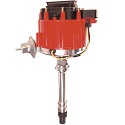 MSD is widely recognized as a global market leader in the development of high-performance aftermarket ignition systems and the distributors needed to cope with the precise control requirements of modern racing and custom ignition systems. Unlike most competing brands, MSD distributors typically use roller bearings to stabilize and support the distributor shaft, which allows for consistently superior control of ignition trigger signals. Overall, MSD’s longstanding history in the industry combined with the high quality of their components makes them a no-brainer when it comes to selecting a distributor, especially for a performance application.
Click here to find an MSD distributor for your vehicle.
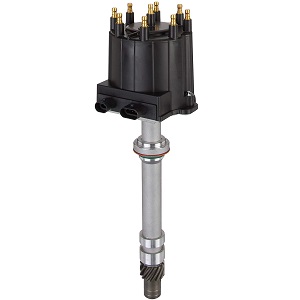
A1 Cardone
 A1 Cardone is well known for the high quality of their distributors, and they supply a wide range of distributors that either meet, or exceed OEM specifications in terms of fit, form, and function. Distributors made by the company are subjected to extensive real world testing to ensure consistently reliable performance under all possible driving and operating conditions. We are confident that you will be satisfied if you decide to use an A1 Cardone distributor for your next project.
Click here to find an A1 Cardone distributor for your vehicle.
Spectra
 Spectra manufactures and supplies distributors that are 100% new, which means that no Spectra distributor contains any remanufactured parts. Moreover, the drive gears on Spectra distributors are fabricated from application specific materials, thus eliminating premature wear of both drive and driven gears as the result of material incompatibilities. Spectra distributors are also often shipped complete with a new rotor arm and cap as well as all required alignment tools, which makes for easy, error free installation. It’s hard to go wrong with a spectra distributor and we think you’ll be very happy if you decide to pick one up.