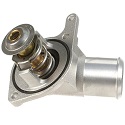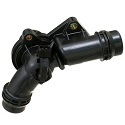
Function of a Thermostat
The function of the thermostat within the cooling system is to regulate coolant flow. The thermostat is essentially a valve within your coolant system that opens or closes at predefined coolant temperatures. When the thermostat is open, coolant is allowed to flow through the radiator. When the thermostat is closed, coolant does not flow through the radiator.
When a motor is cold, the thermostat typically remains closed. This is necessary as it speeds the rate at which your coolant heats up, thereby limiting the negative effects (such as increased component wear) of running your engine cold. Once your engine is up to temp (usually between 180 and 210 degrees Fahrenheit), the thermostat opens and allows coolant to start circulating through your radiator, which in turn cools the engine and prevents it from overheating.
Common Symptoms of a Bad Thermostat
The thermostat is one of the most important parts of the cooling system. There are some general signs that you can detect that will tell you when the thermostat needs to be inspected and potentially replaced. Some of the most common thermostat related issues are as follows:
Engine Overheating – The thermostat allows coolant to circulate through the engine and out to the radiator for cooling. If the thermostat fails to open to allow coolant to circulate, the radiator will not be able to do its job. The result is that the engine will quickly overheat which can lead to catastrophic failure of the engine.
Car Heater Inoperable – A thermostat that is stuck open won’t allow the engine and cooling system to achieve optimum temperature as the radiator will overcool the vehicle. Without that warm coolant, you may notice a deficiency when trying to use the heater to warm the interior cabin of the vehicle as the heater core will not be able to exchange heat with the air blowing over it. In other words, your heater will blow cold air even when you have the heat cranked up. You may also notice a dip in your fuel efficiency.
Check Engine Light Illuminates – As vehicle diagnostics become more complex with each new generation of modern vehicles, some vehicle systems may detect a cooling issues before the temperature gauge reads high. On older vehicles, you may just have a Check Engine Light or a high temperature warning lamp that will illuminate. In modern vehicles, an overheat condition may trigger limp mode in order to mitigate potential engine damage. Either way, your vehicle may just straight up tell you that there’s a cooling issue before you even realize you have one.
Replacing a Thermostat
When you detect an issue with the thermostat, it’s time for a replacement. Replacing a thermostat is a relatively straightforward procedure.
Note: The example steps below are intended for general informational purposes solely to help give you an idea of project difficulty and tools required. As all cars are engineered differently, repair procedures and safety hazards vary from vehicle to vehicle. To ensure that you have a vehicle specific repair procedure and an exhaustive list of potential safety hazards, we advise you reference a factory service manual for your vehicle. Similarly, referencing a repair manual such as Chilton or Haynes might serve as a less expensive alternative.
Step 1 – Before doing any work or inspection, make sure your car is cool to prevent possible burns. Locate your thermostat. For most cars, it is accessible from under the hood. Some makes and models may require you to look underneath the vehicle in order to locate it. It’s usually attached inline to one of the radiator hoses.
Step 2 – If necessary, lift the vehicle off the ground with a floor jack and support it with a set of jack stands. Once you have enough room, drain the coolant into a drain pan. Some radiators have a drain plug, which you can remove using an open wrench or a socket and ratchet. If your radiator does not have a drain plug, you may remove the hose clamp on the lower radiator hose and pull the hose to drain the cooling system. We recommend removing the radiator cap to allow air to enter the system as the coolant drains which will help to prevent splashing.
Step 3 – Once the coolant is drained, you can use a screwdriver or pair of pliers to remove the clamp from any hoses attached to the thermostat. You may want to add a plastic bag over the end of each hose to make sure no contaminants can enter the cooling system during the procedure.
Step 4 – Use a ratchet and socket to remove the thermostat housing. For some vehicles the thermostat is integrated into the housing and for others you have the option of replacing the thermostat and reusing the housing. Considering that the housing is cheap, we have made a habit of replacing both whenever we do the job, especially if the housing is plastic.
Step 5 – Prepare the housing and engine surfaces for reinstallation. Use a gasket scraper to remove any gasket material that remains on the sealing surface, taking care not to cause any damage. Once scraped clean, give the surfaces a wipe to remove any debris.
Step 6 – Most often thermostat housings do not require additional sealant, but this depends on the make and model of vehicle. Follow the manufacturers directions with respect to adding sealant to the gasket before install. You can either refer to a factory service manual or pick up a repair manual specific to your vehicle from Chilton or Haynes.
Step 7 – Reinstall the thermostat and housing assembly back in the vehicle using the same fasteners that you removed. At your option, you can replace these fasteners if they look beat up. Torque fasteners to manufacturer’s spec using a torque wrench.
Step 8 – Reinstall all hoses that were removed, using a screwdriver to tighten the hose clamps back up. Also make sure your radiator drain plug is reinstalled (but take care not to overtighten or you could strip the threads on the plug or radiator).
Step 9 – Now it’s time to add coolant back into the system. Add until you reach the correct level in your coolant reservoir. You’ll then want to follow the manufacturers instructions for bleeding the coolant. It differs vehicle to vehicle, but usually this involves running the car with the heater on at full operating temperature for a little while. Some vehicles require you to open a bleed screw. We recommend watching your vehicle temperature as you are bleeding the system. Turn the engine off if the temperature gets too high and be mindful as your engine components will be hot during this time. Take care to avoid burning yourself.
Step 10 – Once the air has been bled from the cooling system, you can turn off the engine and allow it to cool. Once cool, you may need to add a little extra coolant to ensure the system is at the correct level after bleeding. If you do not wait for it to cool, your coolant may boil when you open the cap, causing potential for splashing and subsequent injury. Once the radiator cap is reinstalled properly and you verify that nothing is amiss, you should be ready to go.
Best Car Thermostat Brands
When it comes to selecting a replacement thermostat for your vehicle, there are many quality brands to pick from. To help narrow your search, we have provided three brands that we highly recommend as we have found them to be a good balance of quality, reliability, and value over the years.
Stant
 Stant has a complete line of replacement thermostats that are built to meet or exceed OEM requirements. They make a variety of different types of thermostat housings ranging from aluminum to structural plastic. Most of their thermostats are integrated into their housings, which is a nice convenience when replacing the one on your car. Overall, Stant’s parts are high quality and are highly likely to serve you well over the long haul. As such, we give them a high recommendation.
Click here to find a Stant thermostat for your vehicle.
Gates
 Gates also offers a line of OEM replacement thermostats that meet or exceed OEM requirements. They make high quality thermostats, housings, and gaskets which will make a thermostat replacement procedure as painless as possible. Their parts are well made, which pairs particularly nicely with the fact that they are also reasonably priced. In our experience, Gates makes a great option if you are looking to replace a thermostat.
Click here to find a Gates thermostat for your vehicle.
Wahler
 Wahler offers thermostats and complete thermostat-housing assemblies. All parts are tested to ensure high quality before they leave the factory. We have found that the parts are built to last, unlike some of the more budget friendly aftermarket car parts outfits. Overall, we have been happy whenever we have used a Wahler part when replacing cooling system components. As such, we are confident that they will treat you well!
