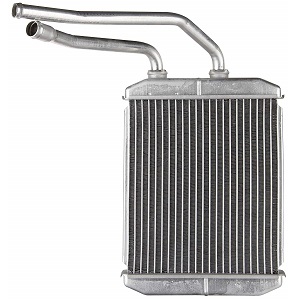
Function Of A Heater Core
A heater core is an integral part of a vehicle’s HVAC system, and is used to extract heat from the circulating engine coolant to heat the passenger cabin. In practice, a heater core is smaller version of the radiator that cools your engine and it also performs the same function, which is to shed the coolant’s heat, only in the case of a heater core, the coolant’s heat is shed into the passenger cabin as opposed to the atmosphere.
In terms of operation, a heater core is located in a sealed container that typically is located under the dashboard, and is connected to the engine cooling system with rubber hoses. One hose, usually the inlet hose, is usually fitted with a flow control valve whose function is to either to shut off the flow of hot coolant through the heater core completely, or to regulate the flow rate of hot engine coolant through the heater core to control the amount of heat that is shed into the passenger cabin.
The enclosure that contains the heater core also contains a variable-speed fan that is responsible for delivering air into the cabin of the vehicle. The fan blows air past the heater core, which in turn heats the air before it enters the cabin. The amount of heat transferred to the air is controlled by the valve that modulates the amount of coolant in the heater core as well as the fan speed.
Common Symptoms Of A Faulty Heater Core
The symptoms of faulty heater cores are similar across all vehicle makes and models, and could include one or more of the following:
Coolant Loss
Since the engine coolant circulates through the cabin heater system when the heater is in operation, any leaks in the heater core, heater hoses, or flow control valve can cause coolant losses that may sometimes be serious enough to cause engine overheating. If however, the leak is in the heater core, the first symptoms are usually wet carpets and a strong odor of engine coolant in the vehicle, even if the engine does not always overheat. You may also notice a thin oily film on the inside of your windows as trace amounts of evaporated coolant condense on the glass.
Note that a large percentage of leaks in heater cores are caused by a phenomenon known as electrolysis, which accelerates corrosion and happens when harmful stray electrical currents use the coolant as a pathway to ground. While stray electrical currents are usually caused by poor ground connections between the battery, engine, and the frame of the vehicle, the actual sources of stray currents are sometimes very difficult to find and correct.
Two other causes of leaks in heater cores are acidic coolant as the result of not replacing the coolant regularly, and pressure waves in the coolant that place damaging cyclical stresses on seams and joints in the heater core.
Reduced Heat Coming From Vents
The most common causes include a reduced coolant flow through clogged heater hoses, clogged or defective heater control valves, and/or blockages in the tubes inside the heater core.
In rare cases, the engine cooling system thermostat may be stuck in the open position, which could prevent the coolant from heating up sufficiently to provide cabin heat, and especially when ambient temperatures are very low.
Continuous Heat Transfer Into Cabin
This is usually caused by a heater flow control valve that is stuck in the open position, as a result of either a broken mechanical control linkage, or a failure in the coolant flow control valve’s electrical control system if the valve is electrically operated.
Replacing A Heater Core
Depending on the vehicle make and model, replacing the heater core may require removal of the entire dashboard, which can be challenging job even for professional technicians. In many cases though, the enclosure that contains the heater core can be accessed if the center console, some dashboard trim panels, and/or one front seat are removed from the vehicle.
Note: The example steps below are intended for general informational purposes solely to help give you an idea of project difficulty and tools required. As all cars are engineered differently, repair procedures and safety hazards vary from vehicle to vehicle. To ensure that you have a vehicle specific repair procedure and an exhaustive list of potential safety hazards, we advise you reference a factory service manual for your vehicle. Similarly, referencing a repair manual such as Chilton or Haynes might serve as a less expensive alternative.
Step 1 – Ensure that the engine is cold to prevent burns and scalds. Use your repair manual to determine the exact location of the heater core, and what needs to be removed or disassembled to gain easy access to the heater core. You may consider draining your coolant prior to beginning by loosening the drain plug on your radiator or removing your lower radiator hose and draining into a fluid drain pan. If you choose to drain your coolant, you should have fresh coolant available to replace it with upon reassembly.
Step 2 – Using suitable tools such as screwdrivers, Allen wrenches, or a set of sockets and a ratchet, remove dashboard trim panels, seats, and the center console as necessary. Take care not to lose any fasteners, screws, clips, or other securing devices as you will need these to reassemble your vehicle later.
Step 3 – When you have clear access to the heater core, move to the engine compartment. Locate the heater hoses, and use a suitable screwdriver or small socket and ratchet to remove the hose clamps. Disconnect the heater core hoses, but be aware that sometimes the hoses are frozen onto the brass heater core pipes, so be patient and take care not to damage the hoses during this step.
Some engine coolant may be lost when the hoses are disconnected, so make sure to keep the coolant off of any painted surfaces as it can cause damage. Additionally, having a fluid drain pan ready can reduce spillage and make cleanup easier later.
Step 4 – Move back inside the vehicle, and disconnect mechanical control linkages such as cables and levers from the heater enclosure. Disconnect any electrical connectors, but take care not to damage or break securing clips- if need be, use a small flat screwdriver to dislocate locking devices on connectors.
Use suitable tools (screwdrivers, Allen wrenches, or Torx bits and sockets) to open the heater core enclosure, and remove the old core from the enclosure. Fit the replacement core, but be sure to replace all rubber or foam sealing strips on the enclosure to ensure a good seal.
Step 5 – Resemble all parts in the reverse order of removal, but if you have removed seats, make sure you use a properly calibrated torque wrench to tighten seat bolts to their factory recommended torque values to prevent damage to the seat frame or seat adjusting mechanisms. Additionally, follow all factory recommend procedures and use new fasteners for installing seats, as they are critical safety items and any deviation from factory spec could create significant danger for vehicle occupants.
Also, make sure that all control cables, and electrical connectors are connected and properly engaged to prevent issues with control and electrical continuity later on.
Step 6 – Reconnect the heater hoses in the engine compartment, and be sure to check the coolant level. Top off the level as required with new coolant to ensure proper engine cooling. If you drained your coolant or if your coolant is low, you may need to bleed your cooling system.
Step 7 – Once everything is reassembled and properly tightened, start the engine and, allow it to reach operating temperature. Activate the cabin heater system to check for coolant leaks, and verify that the heater system is working properly. Also watch for any signs that your motor is overheating. If it is, you likely need to correct your coolant level or bleed your system.
Best Heater Core Brands
Spectra
 When it comes to high quality heater cores, Spectra is king. Heater cores made and supplied by Spectra are fabricated from aluminum, and are fully brazed for maximum strength and resistance against corrosion. Moreover, Spectra heater cores are not only designed and engineered to meet or exceed OEM standards in terms of fit, form, and function, but are also individually pressure-tested, which ensures that Spectra heater cores provide the same durability and performance that an OEM heater core would.
Spectra supplies heater cores for a wide variety of vehicles, and since all products come with a limited lifetime warranty, you can be sure that Spectra is confident in their product. We have always had great experiences with Spectra, and as such, we are confident that a Spectra heater core will serve you well for your next heater core replacement.